
Debian 9 Stretchを新規インストールして、Postfix+Dovecot+Letsencryptでメールシステムを設定した手順です。Jessieの時に設定した過去記事とだいたい同じ手順ですが、Letsencrypt証明書を使いSSL/TLS通信前提の内容にアップデートしています。
このページの目次
前提
- メールサーバーはmail.def-4.com で設定した内容です
- DNSサーバーにMXレコードの設定済み
- ファイアウォールでポート 25, 143, 465, 587, 993, 995の通信許可がされている
- 下記記事の手順で設定したDebian 9 Stretchを元にしています。
証明書用ダミーサイト作成
certbot コマンドで Letsencrypt 証明書を発行します。ACME認証のためのダミー公開ディレクトリの設定が必要です。2018年にはワイルドカード対応のLet’s Encrypt 証明書がリリースされるようなので、それまでの対処方法です。
/etc/nginx/conf.d/mail-server.conf ファイルを作成して、ダミーサイトを設定します。mail-server.conf のファイルの中身は下記のようにします。ドキュメントルートはnginxの初期ディレクトリにしています。新たに空のディレクトリを作成しても良いです。
(変更場所を赤文字にしています。)
server {
    listen       80;
    server_name  mail.def-4.com;

    location / {
        root   /usr/share/nginx/html;
        index  index.html index.htm index.php;
    }

    location ^~ /.well-known/acme-challenge {
        alias /var/lib/letsencrypt/.well-known/acme-challenge;
        default_type "text/plain";
        try_files $uri =404;
    }
}
記述間違いがないかテストnginx -t してから、nginxを再起動します。
# nginx -t
# /etc/init.d/nginx restart
証明書発行
メールサーバー名でLetsencrypt証明書を発行します。
# certbot certonly --webroot --webroot-path /var/lib/letsencrypt -d mail.def-4.com
証明書の発行に成功すれば、以下のファイルが作成されているので利用します。
- /etc/letsencrypt/live/mail.def-4.com/fullchain.pem …サーバ証明書と中間証明書が結合されたファイル
- /etc/letsencrypt/live/mail.def-4.com/privkey.pem…秘密鍵
Dovecot + Postfix インストール
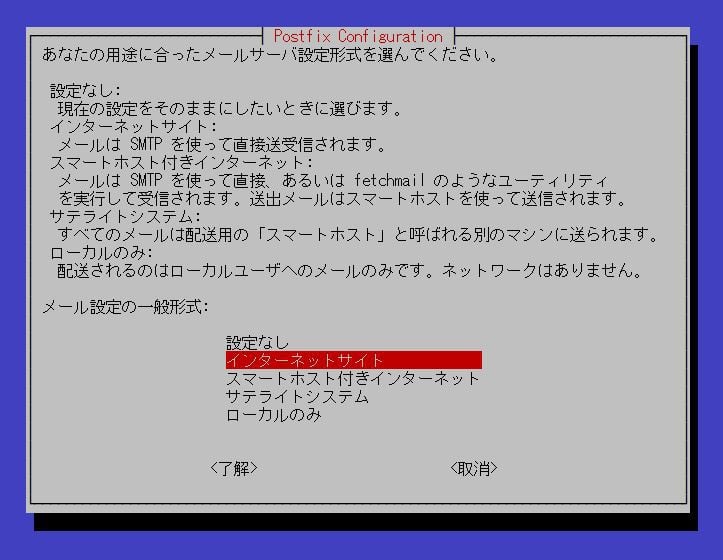
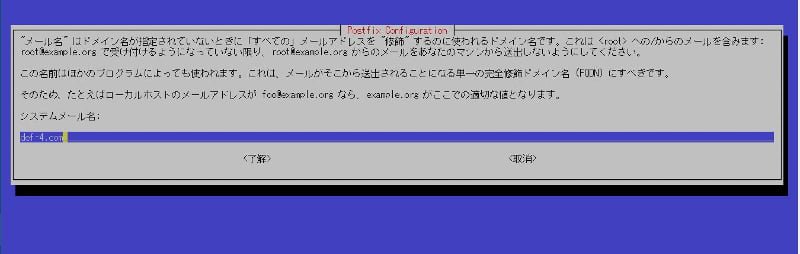
DovecotとPostfixをインストールします。
# apt update
# apt install dovecot-imapd dovecot-pop3d postfix
Dovecotの設定
dovecotの設定は、/etc/dovecot/conf.d ディレクトリの中の3(+1)ファイルを編集します。
- /etc/dovecot/conf.d/10-master.conf
- /etc/dovecot/conf.d/10-mail.conf
- /etc/dovecot/conf.d/10-ssl.conf
- /etc/dovecot/conf.d/10-auth.conf (旧メールソフトに対応させる場合)
10-master.conf ファイルの編集
22-23行目の# を外してIMAPsのポート993を待ち受け状態にします。19行目のIMAPポート143はデフォルトで有効になっているので# はそのままで大丈夫です。
service imap-login {
  inet_listener imap {
    #port = 143
  }
  inet_listener imaps {
    port = 993
    ssl = yes
  }
43-44行目の# を外してPOP3sのポート995を待ち受け状態にします。
service pop3-login {
  inet_listener pop3 {
    #port = 110
  }
  inet_listener pop3s {
    port = 995
    ssl = yes
  }
}
96-98の# を外して、PostfixのSASL認証と連携させます。
  # Postfix smtp-auth
  unix_listener /var/spool/postfix/private/auth {
    mode = 0666
  }
10-mail.conf ファイルの設定
Maildir形式に変更します。30行目を# を付けてコメントアウトして31行目を追記します。
#mail_location = mbox:~/mail:INBOX=/var/mail/%u
mail_location = maildir:~/Maildir
10-ssl.conf ファイルの編集
POP3s、IMAPs、SMTPsを使うならTLS/SSL必須なので有効にします。先ほど発行した証明書パスを指定します。
6行目を# を外して、yesに変えて有効にします。
ssl = yes
12-13行目で# を外して証明書ファイルの場所を指定します。
ssl_cert = </etc/letsencrypt/live/mail.def-4.com/fullchain.pem
ssl_key = </etc/letsencrypt/live/mail.def-4.com/privkey.pem
10-auth.conf ファイルの編集
100行目に login を追加してWindows Liveメール、Windowsメール、Outlook Expressなどの旧メールソフトに対応させます。
auth_mechanisms = plain login
Postfixの設定
postfixの設定は/etc/postfix の中の2つのファイルを編集します。
- /etc/postfix/main.cf
- /etc/postfix/master.cf
main.cf ファイルの編集
ファイルの最後に下記を追加します。Maildir形式にするのと、Dovecot SASLを利用します。(2017.9.30修正:ServerからWarningが出ていた一行を削除しました。)
home_mailbox = Maildir/

smtpd_sasl_type = dovecot
smtpd_sasl_path = private/auth
smtpd_sasl_auth_enable = yes
smtpd_relay_restrictions =
  permit_sasl_authenticated,
  reject_unauth_destination
(2019/08/04追記)25-26行目の証明書のパスを発行したLetsencryptのパスに変更が必要でした。ここを変更しないとメールソフトでメール送信するたびに証明書のCN名が違うと言われてしまいます。
# TLS parameters
smtpd_tls_cert_file=/etc/letsencrypt/live/mail.def-4.com/fullchain.pem
smtpd_tls_key_file=/etc/letsencrypt/live/mail.def-4.com/privkey.pem
(2019/09/25追記)ポート25をブロックしているISPなどでは、リレー設定が必要です。暗号化のまま相手にメールを届ける場合にも設定が必要です。

master.cf ファイルの編集
今回はポート465のSMTPsを利用するため、28-38行目の# を外します。ポート587のsubmissionポートも使う場合は、17-27行目も# を外します。
#tlsproxy  unix  -       -       -       -       0       tlsproxy
#submission inet n       -       -       -       -       smtpd
#  -o syslog_name=postfix/submission
#  -o smtpd_tls_security_level=encrypt
#  -o smtpd_sasl_auth_enable=yes
#  -o smtpd_reject_unlisted_recipient=no
#  -o smtpd_client_restrictions=$mua_client_restrictions
#  -o smtpd_helo_restrictions=$mua_helo_restrictions
#  -o smtpd_sender_restrictions=$mua_sender_restrictions
#  -o smtpd_recipient_restrictions=
#  -o smtpd_relay_restrictions=permit_sasl_authenticated,reject
#  -o milter_macro_daemon_name=ORIGINATING
smtps     inet  n       -       -       -       -       smtpd
  -o syslog_name=postfix/smtps
  -o smtpd_tls_wrappermode=yes
  -o smtpd_sasl_auth_enable=yes
  -o smtpd_reject_unlisted_recipient=no
  -o smtpd_client_restrictions=$mua_client_restrictions
  -o smtpd_helo_restrictions=$mua_helo_restrictions
  -o smtpd_sender_restrictions=$mua_sender_restrictions
  -o smtpd_recipient_restrictions=
  -o smtpd_relay_restrictions=permit_sasl_authenticated,reject
  -o milter_macro_daemon_name=ORIGINATING
#628       inet  n       -
サービス再起動と動作確認
設定が有効になるのはサービス再起動後からです。
/etc/init.d/dovecot restart
/etc/init.d/postfix restart
動作確認
メールクライアントにアカウント設定を入れる前に動作確認をしておきます。
待ち受けポート確認
lsof -i コマンドで各ポートがLISTENになっているか確認します。
# lsof -i

0t0  TCP *:pop3 (LISTEN)
0t0  TCP *:pop3s (LISTEN)
0t0  TCP *:imap2 (LISTEN)
0t0  TCP *:imaps (LISTEN)
0t0  TCP *:smtp (LISTEN)
0t0  TCP *:urd (LISTEN)
telnet 127.0.0.1 25
# telnet 127.0.0.1 25

Trying 127.0.0.1...
Connected to 127.0.0.1.
Escape character is '^]'.
220 server.def-4.com ESMTP Postfix (Debian/GNU)
telnetでポート25に接続してみます。Postfixの文字が出ていればOKです。quit と入力して終了します。
Postfixの表示が出ていない場合は何かが間違っています。この場合はCtrl+] (‘む’のキー)を押してqで戻ります。
telnet 127.0.0.1 110
# telnet 127.0.0.1 110

Trying 127.0.0.1...
Connected to 127.0.0.1.
Escape character is '^]'.
+OK Dovecot ready.
ポート110ではDovecot readyの表示が出ていればOKです。
Maildirディレクトリ作成
メール保存をMaildir形式にしたので、Maildirディレクトリを作成します。
既存ユーザーでログインした状態で
# su [user_name]
$ maildirmake.dovecot ~/Maildir
既存の各ユーザーのホームディレクトリにMaildirフォルダを作ります。
次は、suコマンドでroot権限になってから
# maildirmake.dovecot /etc/skel/Maildir
これで今後adduser [user-name] で追加するユーザーはMaildirディレクトリが自動で作られます。
メールクライアントの設定
メールソフトにアカウントを設定して、送受信ができれば設定完了です。
- POP3サーバーの場合、ポート995、SSL/TLSあり、通常のパスワード認証
- IMAPサーバーの場合、ポート993、SSL/TLSあり、通常のパスワード認証
- SMTPサーバーは、ポート465、SSL/TLSあり、通常のパスワード認証

次の記事では、このメールシステムを元にWEBメールRoundcubeをインストールしました。 WEBメールRoundcubeをインストール(Nginx+Debian Stretch)