自宅サーバーを実際の運用で公開するにはファイアウォールiptablesの設定はセキュリティ上必須項目ですね。いろいろググッて一番カンタンと思ってる自分のサーバーでの設定方法の記録です。
前提
- Debian 7.7「wheezy」のインストールの記事の通りにインストールが済んでいる
- SSHのポート番号は55555を利用すると仮定
このページの目次
iPv6については全通信拒否の設定にしておきます、将来iPv6が必要になったら変更できるようにしておきます。
そもそも私の契約しているspaaqs光ホームタイプ(旧USEN)は新規契約受付終了しており、将来にわたってiPv6未対応確定と思われるのでたいして考慮する必要もないのですが…
iptables/ip6tablesの状態を調べる
iptablesはDebianインストール時にインストール済みですが、デフォルトのままでは設定が入っていない状態です。
suコマンドで管理者権限になってから調べて見ます。
iptables -L
Chain INPUT (policy ACCEPT)
target     prot opt source               destination

Chain FORWARD (policy ACCEPT)
target     prot opt source               destination

Chain OUTPUT (policy ACCEPT)
target     prot opt source               destination
INPUTもOUTPUTも全ポート通信許可という状態です。
IPv6の状態も調べる場合は
ip6tables -L
IPv6も同じく全ポート許可状態です。
iptables-persistentのインストール
iptablesだけで設定を進めることもできますが、それはlinux上級者の話です。ここはiptables-persistentをインストールしたほうが簡単なので迷わずインストールします。
aptitude install iptables-persistent

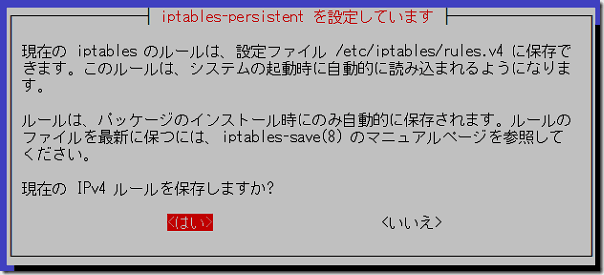
IPv4のルールを保存するか聞いてくるので、「はい」で進みます。

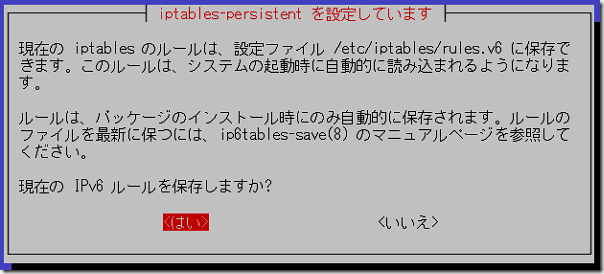
IPv6も同じく「はい」で進んでインストールを完了させます。
これでサーバー起動時に自動的にiptablesが有効になり、読み込む設定ファイルrules.v4とrules.v6が出来上がっています。
ファイルの場所はDebianならば
- IPv4の設定ファイルは /etc/iptables/rules.v4
- IPv6の設定ファイルは /etc/iptables/rules.v6
これを書き換えていきます。
設定ファイルを書き換える
ファイアウォールのルールを設定するわけですが、ここは上級者ならいかようにも設定できると思いますが、やはりテンプレート的なものがあるようで、WEBサーバー単体の場合、定番の記述方法が Debian wiki にあるので丸々コピペで頂いてしまいます。
Debian Wiki / iptables
WEBサーバー単体の場合 rules.v4
デフォルト状態の/etc/iptables/rules.v4の中身を全部消して、下のように書き換えます。
下に表示されている記述をコピペすると、iptablesがエラーを出してしまいます。iptablesは相当シビアみたいで、プラグインSyntaxHighlighter Evolvedで表示されたのをそのままコピペだと設定ファイルを読み込むときに失敗します。必ず上のファイルを開いてからコピペしてください。
【2014/12/27追記】プラグインをCrayon Syntax Highlighterに変更しました。
*filter

# Allows all loopback (lo0) traffic and drop all traffic to 127/8 that doesn't use lo0
-A INPUT -i lo -j ACCEPT
-A INPUT ! -i lo -d 127.0.0.0/8 -j REJECT

# Accepts all established inbound connections
-A INPUT -m state --state ESTABLISHED,RELATED -j ACCEPT

# Allows all outbound traffic
# You could modify this to only allow certain traffic
-A OUTPUT -j ACCEPT

# Allows HTTP and HTTPS connections from anywhere (the normal ports for websites)
-A INPUT -p tcp --dport 80 -j ACCEPT
-A INPUT -p tcp --dport 443 -j ACCEPT

# Allows SSH connections
# The --dport number is the same as in /etc/ssh/sshd_config
-A INPUT -p tcp -m state --state NEW --dport 55555 -j ACCEPT

# Now you should read up on iptables rules and consider whether ssh access
# for everyone is really desired. Most likely you will only allow access from certain IPs.

# Allow ping
#  note that blocking other types of icmp packets is considered a bad idea by some
#  remove -m icmp --icmp-type 8 from this line to allow all kinds of icmp:
#  https://security.stackexchange.com/questions/22711
-A INPUT -p icmp -m icmp --icmp-type 8 -j ACCEPT

# log iptables denied calls (access via 'dmesg' command)
-A INPUT -m limit --limit 5/min -j LOG --log-prefix "iptables denied: " --log-level 7

# Reject all other inbound - default deny unless explicitly allowed policy:
-A INPUT -j REJECT
-A FORWARD -j REJECT

COMMIT
20行目のSSHのポート番号だけは、環境に合わせて変更してください。
入ってくるのはWEBサーバーのポート80と443、SSHのポートを許可、ping許可、こちらから出して戻ってきたものを許可。それ以外は拒否。出ていくのは全部許可。5分以内に連続した不正アタックをログにとる。
ということになっているようです。
rules.v6も書き換えます。
全通信拒否にするためetc/iptables/rules.v6は、ACCEPTをDROPに変えます。
*filter
:INPUT DROP [0:0]
:FORWARD DROP [0:0]
:OUTPUT DROP [0:0]
COMMIT
動作確認
設定が有効になるのはサービス再起動後のようです。
/etc/init.d/iptables-persistent start
【2015/05/07】Debian8.0 jessieではサーバーの再起動が必要のようです。
エラーが出ずに再起動したら、状態を確認します。
iptables -L
ip6tables -L
追加で必要なポートを開ける
私の場合は、メールサーバー用のポートを開けています。
*filter

# Allows all loopback (lo0) traffic and drop all traffic to 127/8 that doesn't use lo0
-A INPUT -i lo -j ACCEPT
-A INPUT ! -i lo -d 127.0.0.0/8 -j REJECT

# Accepts all established inbound connections
-A INPUT -m state --state ESTABLISHED,RELATED -j ACCEPT

# Allows all outbound traffic
# You could modify this to only allow certain traffic
-A OUTPUT -j ACCEPT

# Allows HTTP and HTTPS connections from anywhere (the normal ports for websites)
-A INPUT -p tcp --dport 80 -j ACCEPT
-A INPUT -p tcp --dport 443 -j ACCEPT

# Allows SSH connections
# The --dport number is the same as in /etc/ssh/sshd_config
-A INPUT -p tcp -m state --state NEW --dport 55555 -j ACCEPT

# Now you should read up on iptables rules and consider whether ssh access
# for everyone is really desired. Most likely you will only allow access from certain IPs.

#POPメールサーバー用
-A INPUT -p tcp --dport 110 -j ACCEPT

#SMTPメールサーバー用
-A INPUT -p tcp --dport 25 -j ACCEPT

#サブミッションポート用
-A INPUT -p tcp --dport 587 -j ACCEPT

#IMAPメールサーバー用
-A INPUT -p tcp --dport 143 -j ACCEPT

# Allow ping
#  note that blocking other types of icmp packets is considered a bad idea by some
#  remove -m icmp --icmp-type 8 from this line to allow all kinds of icmp:
#  https://security.stackexchange.com/questions/22711
-A INPUT -p icmp -m icmp --icmp-type 8 -j ACCEPT

# log iptables denied calls (access via 'dmesg' command)
-A INPUT -m limit --limit 5/min -j LOG --log-prefix "iptables denied: " --log-level 7

# Reject all other inbound - default deny unless explicitly allowed policy:
-A INPUT -j REJECT
-A FORWARD -j REJECT

COMMIT
追加する行の順番があるようで注意です。お尻に追加するとダメということもあったりします。
最後にひとこと
これでファイアウォールの設定ができました。入ってくるものだけ制限して、出て行くものは制限無し、たとえるならばマンション入口のオートロック的なセキュリティレベルだと思います。あとは、ご自身の環境に合わせてルール作りをしていってください。


